
Adding Memory
The Xserve has 12 memory slots. The systems come with at least 3 GB of memory on
three 1 GB DIMMs. To improve performance and capacity, you can install up to twelve
DIMMs.
You can use the following memory in the Xserve:
1066 MHz DDR3 ECC (Error Correcting Code) DIMMs
Â
1 GB, 2 GB, or 4 GB DIMMs (optimally, 6 or 12 identical DIMMs for a dual-CPU Xserve
Â
and 3 or 6 identical DIMMs for a single-CPU Xserve)
Important:
Apple recommends that you use Apple-approved DIMMs. Other DIMMs
might degrade the performance of the Xserve. DIMMs from older Xserve systems are
not compatible with this Xserve. You can purchase Apple-approved memory online
from the Apple Store at www.apple.com/store.
Before you purchase DIMMs other than those recommended by Apple, make sure that
the memory manufacturer conforms to the Joint Electron Device Engineering Council
(JEDEC) specification. Make sure that the DIMMs support the correct timing modes and
that the Serial Presence Detect (SPD) feature has been implemented in accordance
with the JEDEC specification. To check DIMM compatibility, see the Macintosh Products
Guide on Apple’s website at www.apple.com/guide.
34
Chapter 2
Installing or Replacing Components
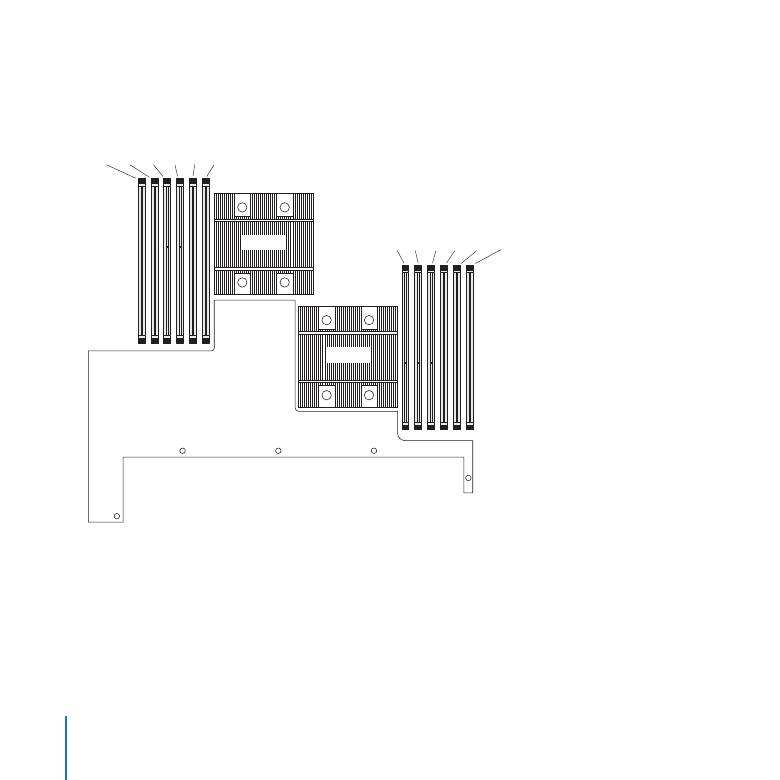
The 12 memory slots are labeled A1 through A6 and B1 through B6, in interleaved
fashion. Single-CPU systems might not have B slots.
(Back)
(Front)
CPU B
B3 B6 B2 B5 B1 B4
A4 A1 A5 A2 A6 A3
CPU A
35
Chapter 2
Installing or Replacing Components
Installation Guidelines
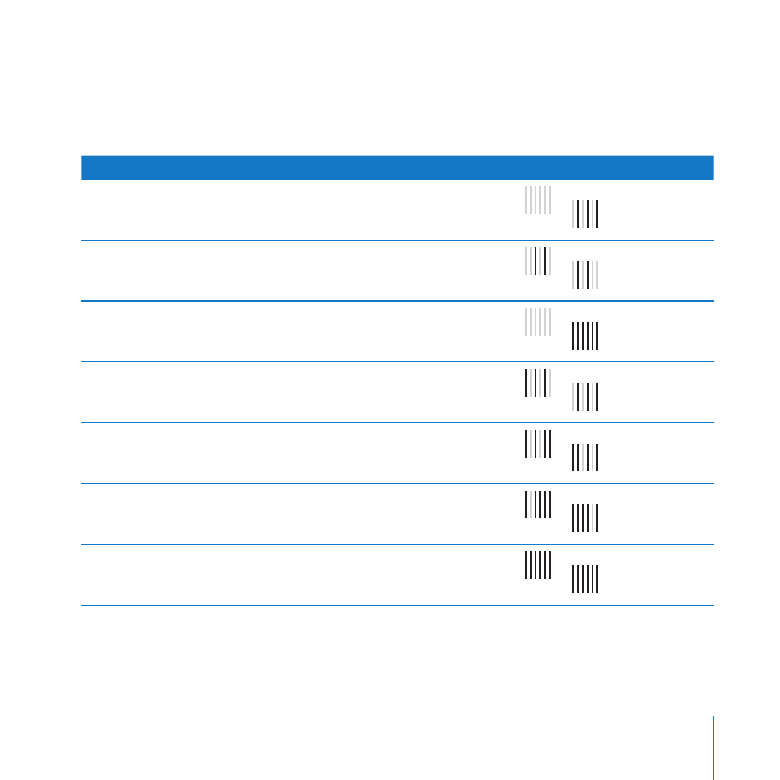
For the best Xserve performance, install identical DIMMs as shown in the following
table.
Number of DIMMs
Install in these slots:
3 (single or dual CPU)
A1 A2 A3
B
A
4 (dual CPU)
A1 A2
B1 B2
6 (single CPU)
A1 A2 A3 A4 A5 A6
6 (dual CPU)
A1 A2 A3
B1 B2 B3
8 (dual CPU)
A1 A2 A3 A4
B1 B2 B3 B4
10 (dual CPU)
A1 A2 A3 A4 A5
B1 B2 B3 B4 B5
12 (dual CPU)
A1 A2 A3 A4 A5 A6
B1 B2 B3 B4 B5 B6

36
Chapter 2
Installing or Replacing Components
For Best Performance
For the best possible performance from a dual-CPU Xserve, install six or twelve identical
DIMMs in the slots shown in the table above. For a single-CPU Xserve, install three or
six identical DIMMs. The Memory Slot Utility will advise you if your DIMM configuration
can be improved. The utility runs automatically the first time you start up the Xserve
after changing the memory configuration, or you can run it at any time from /System/
Library/CoreServices/Memory Slot Utility.
To install memory:
1
Review the memory installation rules and make sure you have the right type of DIMMs.
2
Shut down the Xserve and unplug all cables.
Important:
Be sure the Xserve is turned off and the power cords are unplugged before
you install or remove memory.
3
Remove the Xserve from the rack and open it. For instructions, see “Opening and
Closing the Xserve” on page 30.
WARNING:
Always wait 5 to 10 minutes for the Xserve to cool down before you try
to install memory. DIMMs that are already installed and other components near the
DIMM slots may be very hot.
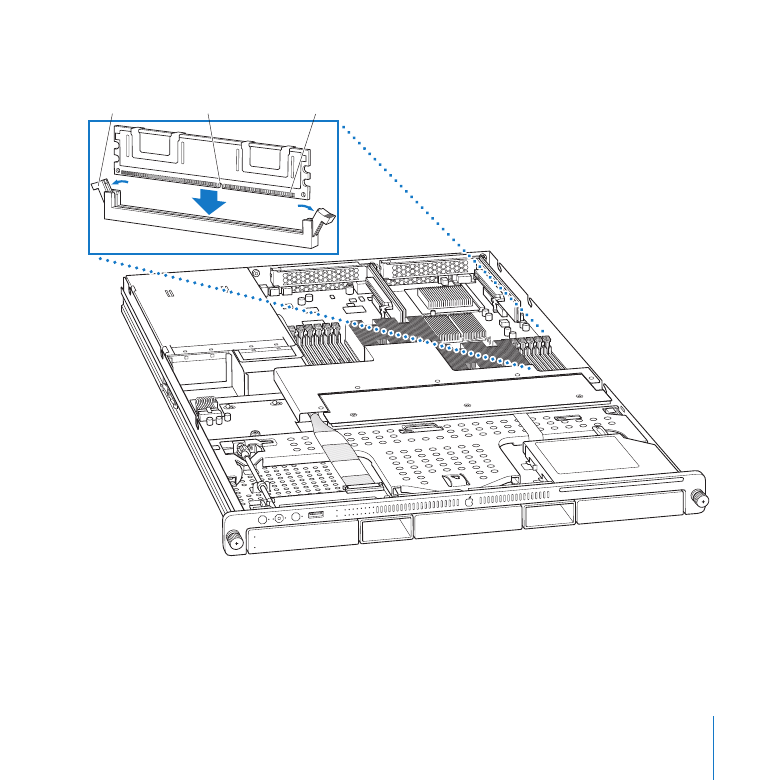
4
Open the ejectors on a slot by pushing them outward.
Important:
Don’t touch the gold connectors on the DIMMs.
5
Without touching its gold connectors, align a DIMM in the slot and push straight down
on both ends until the DIMM is seated and the ejectors snap upright.
37
Chapter 2
Installing or Replacing Components
6
Repeat for additional DIMMs.
Connectors
Notch
Ejectors
7
When you restart the Xserve, watch for the Memory Slot Utility’s evaluation of your
new memory configuration.
38
Chapter 2
Installing or Replacing Components