
Installing the Xserve
Operating Environment
Make sure that the ambient temperature in the rack is within the limits established
for the Xserve and all other equipment. For the Xserve operating temperature
requirements, see Appendix A, “Specifications,” on page 45. Make sure that both the
rack itself and the room where the rack is located are sufficiently ventilated to maintain
the necessary temperature range.
Installing the Xserve
Follow these instructions to install the Xserve in an equipment rack.
Installation Summary
Step 1: Remove the shipping material
Â
Step 2: Assemble a pair of slide rails that are the right length for your rack
Â
Step 3: Install the rails loosely in the rack
Â
Step 4: Align and secure the rails
Â
Step 5: Slide the Xserve into the rack
Â
Step 6: Connect the cables
Â
Step 7: Connect a keyboard, display, and mouse (optional)
Â
Installing Optional Components Before You Begin
To work inside the Xserve, you need to remove it from the rack. If you plan to install
additional memory, PCI cards, or other internal components before you start using the
Xserve, you might want to do so now. For help installing components, see Chapter 2.
12
Chapter 1
Installing the Xserve
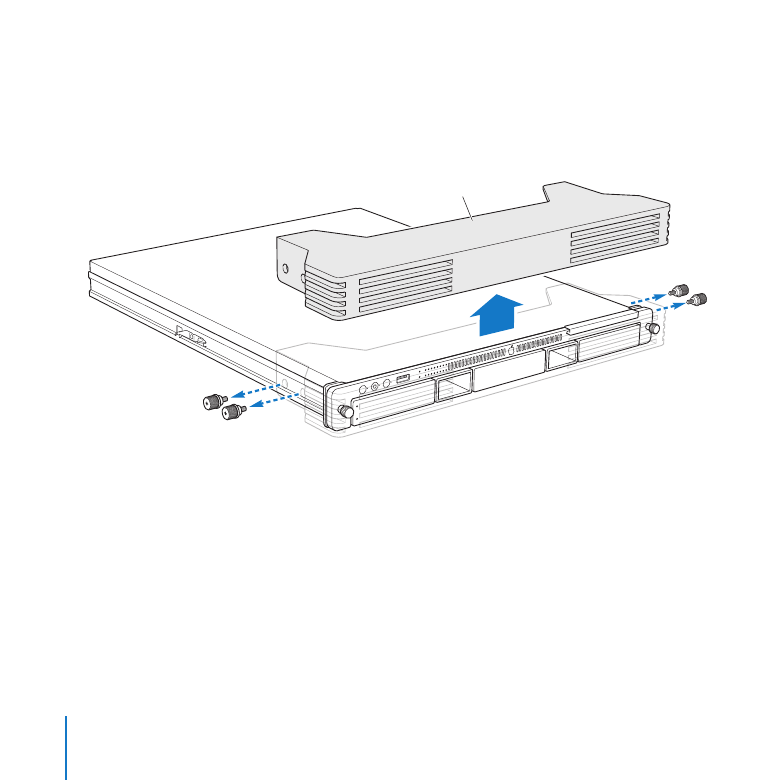
Step 1: Remove the protective shipping materials
1
Remove the Xserve from its box and place it on a flat surface.
2
Remove the protective faceplate by unscrewing the thumbscrews on each side of the
faceplate and lifting it off.
Protective faceplate
3
Remove any plastic film covering the front or top of the Xserve.
Important:
Do not remove the small plastic protector in the optical drive slot. Leave
this protector in place until the Xserve is secured in the rack. Keep the protector and
return it to the drive slot whenever you move the Xserve or pack it for shipping.
13
Chapter 1
Installing the Xserve
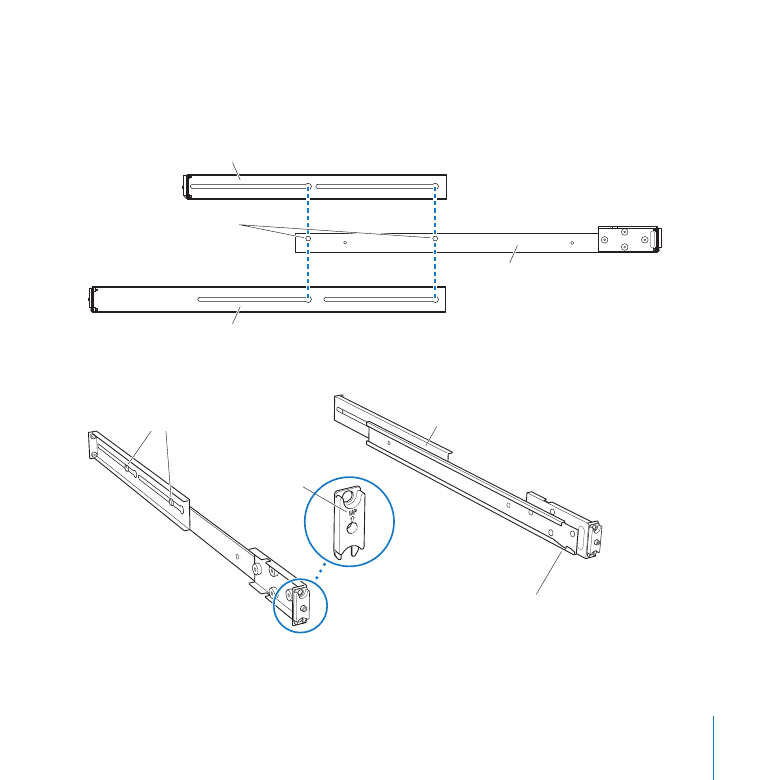
Step 2: Assemble the mounting rails
The Xserve comes with both short and long extensions that you combine with
standard front rails to create a pair of rails that are the right depth for your rack.
Long extension
Short extension
These pegs engage the
slots in the extension.
Rail
Slide a matching rear extension onto each of the two front rails.
m
The extension goes on
the outside of the rail.
Engage the pegs
in both slots.
This notch should
be on the bottom.
This end is up.
14
Chapter 1
Installing the Xserve
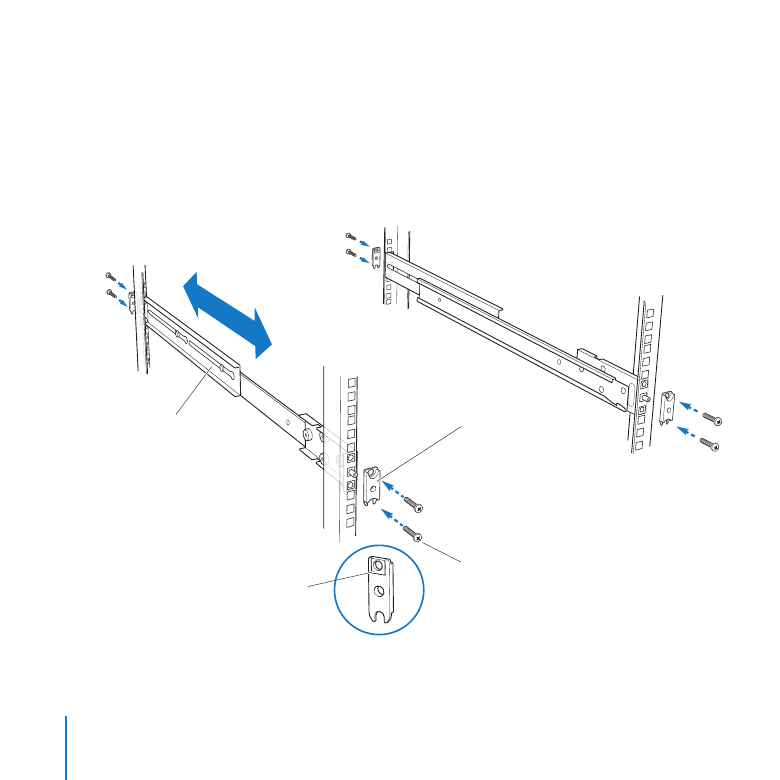
Step 3: Install the rails loosely in the rack
1
Place an assembled rail in the rack (it will support itself temporarily while you gather
the fasteners). The way you fit the rail depends on the rack.
Â
If you have a square-hole rack, start with the rail flanges inside the posts and expand
the rail between the front and rear posts until the small round guide on each flange
extends through the rail.
Expand the rails
so they fit inside
the rack posts.
Position the spacer
on the outside of the
post, and over the
threaded guide on the rail.
Position the spacer so the small
block on the back engages the
square hole in the rack support.
Use the screws that came
with the rail to secure the
spacer to the rail.
15
Chapter 1
Installing the Xserve
Â
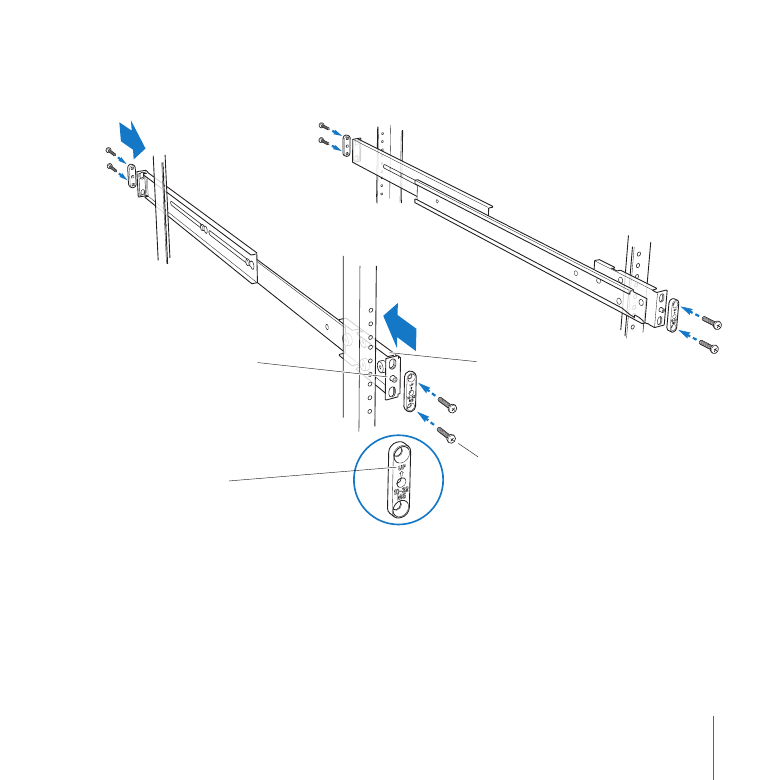
If you have a threaded-hole rack, start with the rail flanges outside the rack posts and
compress the rail into position.
Position the spacer
over the threaded guide
on the rail assembly.
This end is up.
Compress the rails
so that they fit on the
outside of the rack posts.
Use either eight 10-32 or eight
M5 screws (supplied), depending on
which type your rack requires.
2
Slide a spacer, with the arrow up, over the small round guide at the ends of each rail
and install the mounting screws finger tight.
Don’t tighten the mounting screws until you align the rails in the next step.
16
Chapter 1
Installing the Xserve
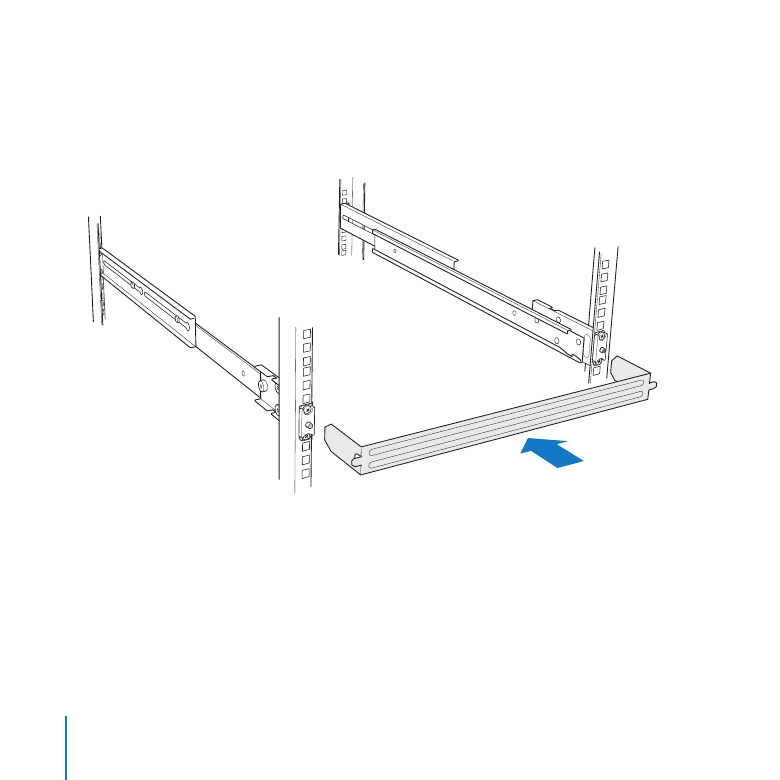
Step 4: Align and secure the rails
To make sure the Xserve slides easily in and out of the rack, use the alignment guide to
position the rails in the rack before you tighten the mounting screws.
1
Insert the alignment guide in the front of the rails.
Insert the alignment
guide into the rails
and tighten all the screws.
2
Tighten the front mounting screws
Important:
If you have a square-hole rack, make sure the raised alignment block on
the back of each mounting spacer is seated properly in the hole in the rack post as you
tighten the screws.
3
Tighten the rear mounting screws.
4
Remove the alignment guide.
17
Chapter 1
Installing the Xserve
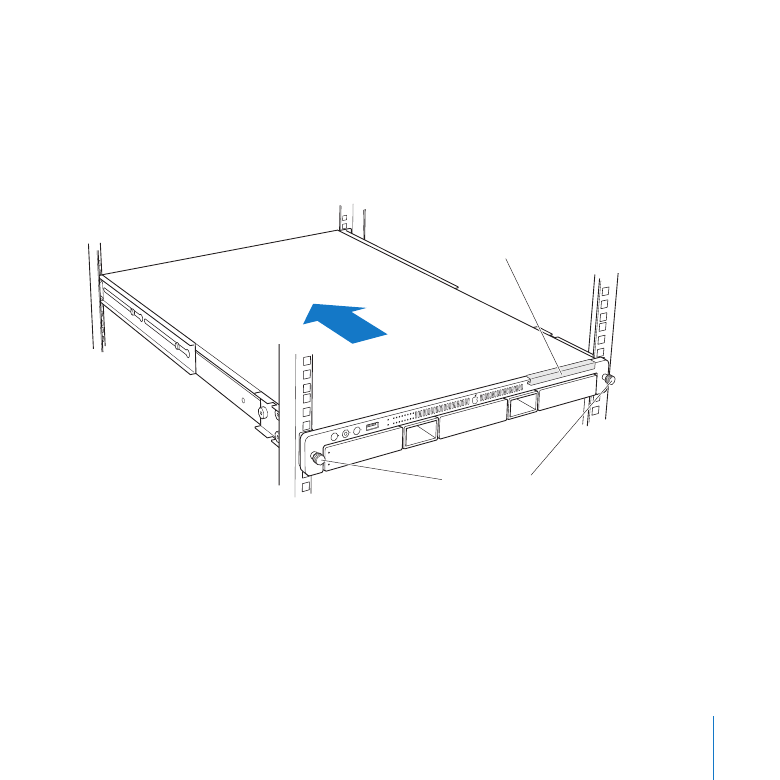
Step 5: Slide the Xserve into the rack
1
Guide the slides on the Xserve into the channels on the rails.
Important:
Make sure both the left and right slides on the Xserve go inside the rail
channels. If you have difficulty, set aside the Xserve and use the alignment guide to
check the spacing between the rails.
Thumbscrews
Optical drive protector
2
Slide the Xserve into the rack until it stops.
3
Tighten the thumbscrews at each end of the front panel to secure the Xserve in the
rack.
4
Remove the plastic optical drive protector.
Important:
Keep the protector and return it to the drive slot whenever you move the
Xserve to another location or pack it for shipping.
18
Chapter 1
Installing the Xserve
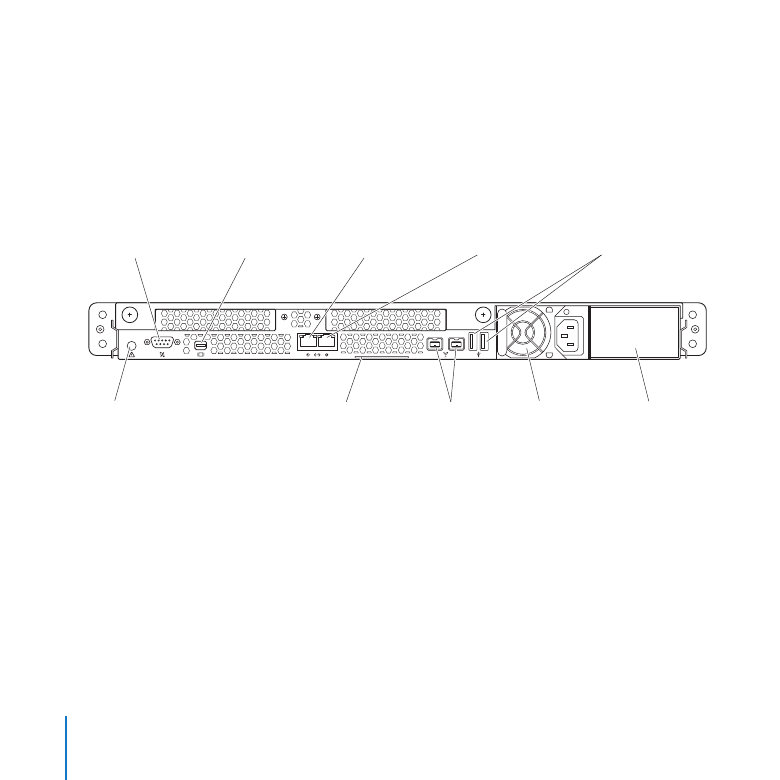
Step 6: Connect the cables
1
Connect a power cord to the power supply and secure it with the wire clip.
The fan in the power supply and some system status lights come on when you connect
the power cord, before you turn on the Xserve.
2
Connect the network cables.
If you’re using only one Ethernet cable, connect it to port 1.
Serial console port
Mini DisplayPort
Ethernet port 2
Ethernet port 1
System identifier
button/light
FireWire 800
ports (2)
USB 2.0 ports (2)
Power supply
bay 2
Power supply
bay 1
System information tag
(pullout tab)
19
Chapter 1
Installing the Xserve
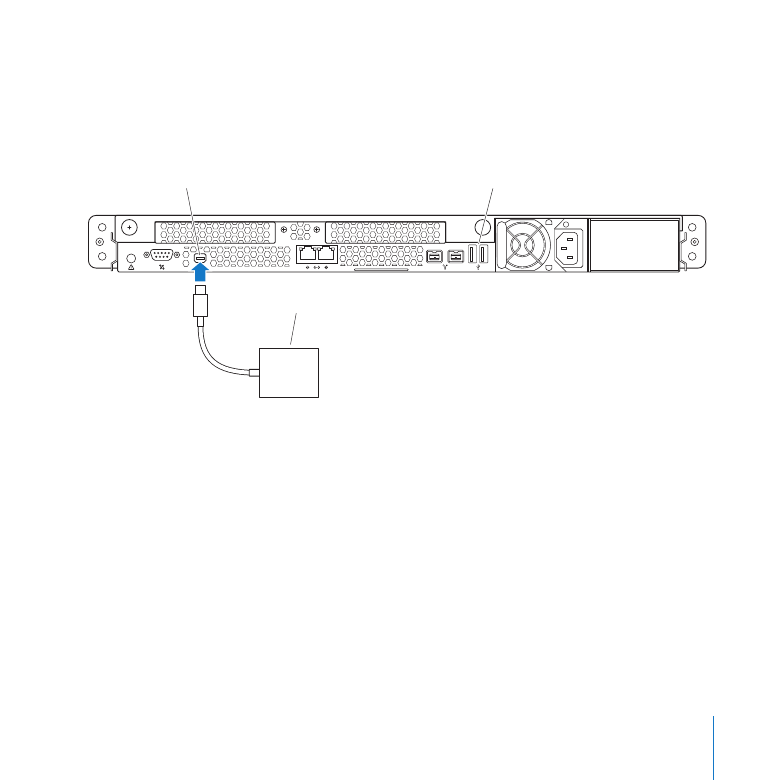
Step 7: Connect a keyboard, display, and mouse (optional)
You can connect a display, keyboard, and mouse directly to the Xserve. You can also
manage the Xserve without connecting a display or keyboard by using tools such as
Server Admin, Server Monitor, Apple Remote Desktop, and the command line.
USB 2.0 ports (2)
VGA adapter
Mini DisplayPort
1
Connect the keyboard to one of the USB ports on the back panel.
2
Connect the mouse to the second USB port or to the keyboard.
3
Connect the video cable to the Mini DisplayPort on the back panel. If necessary, use a
VGA or DVI adapter, sold separately.

20
Chapter 1
Installing the Xserve